Contact LisaLise

Please use the form on the right to contact LisaLise.

Majestic Court 5, St. Mary's Street
Mellieha
Malta

LisaLise offers online education of natural plant-based cosmetics via e-books and courses

LLBlogHEADER2020-3.gif

Shop Blog

A look inside the LisaLise natural cosmetics lab with free formulas, DIY how-to's, ingredients tips, sneak peeks, and more.

Filtering by Category: Ingredients

Dry Extract is Not the Same as Powder

Lise

Sometimes, a single incorrect word can lead to a failed formula, miscommunication, frustration, foot stamping, and even a bit of hair pulling.

This particular example took somewhat longer than I'd like to admit to solve, but it finally did get solved, and it was in large part due to a very helpful and informative manufacturer.

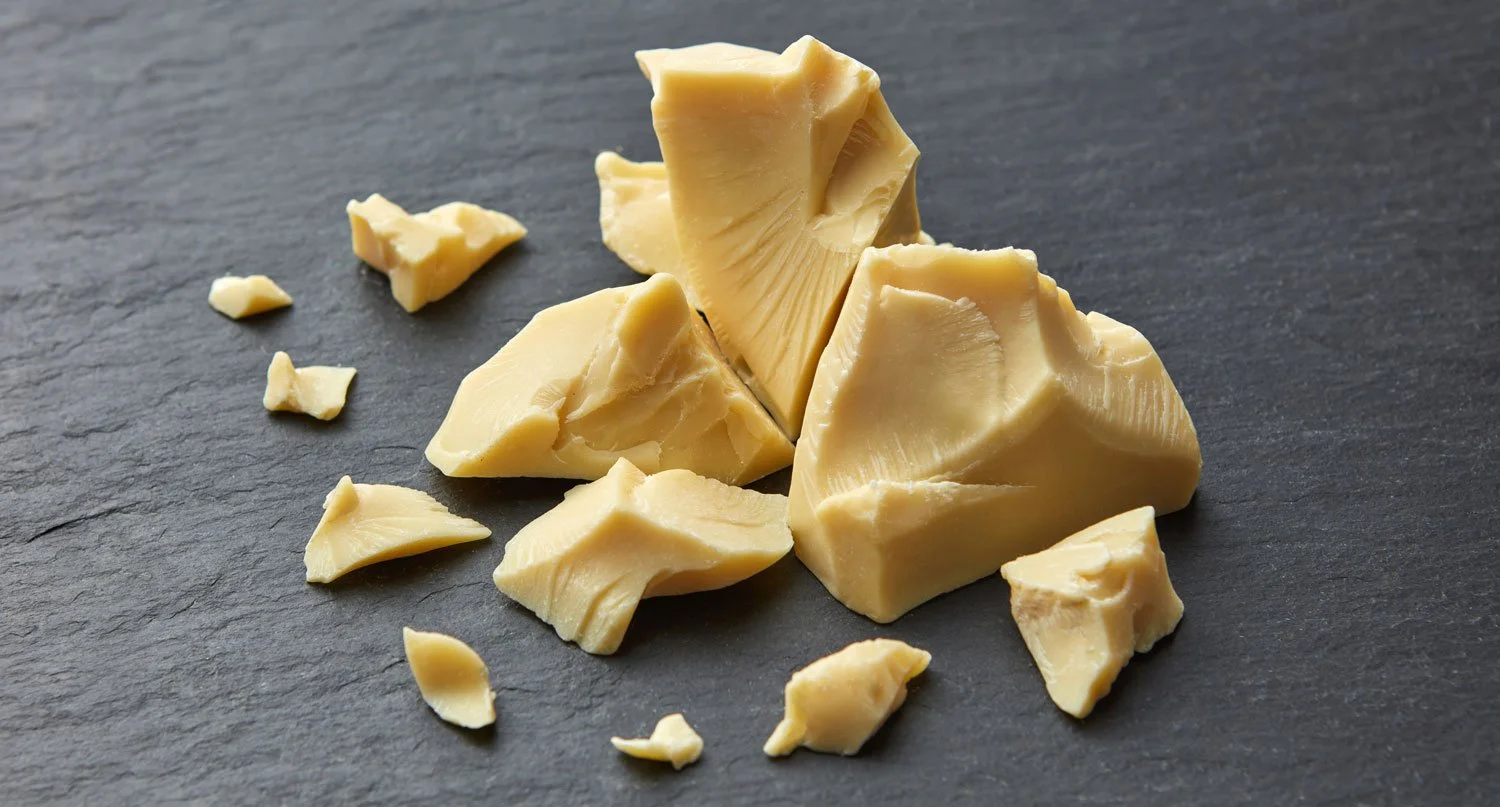
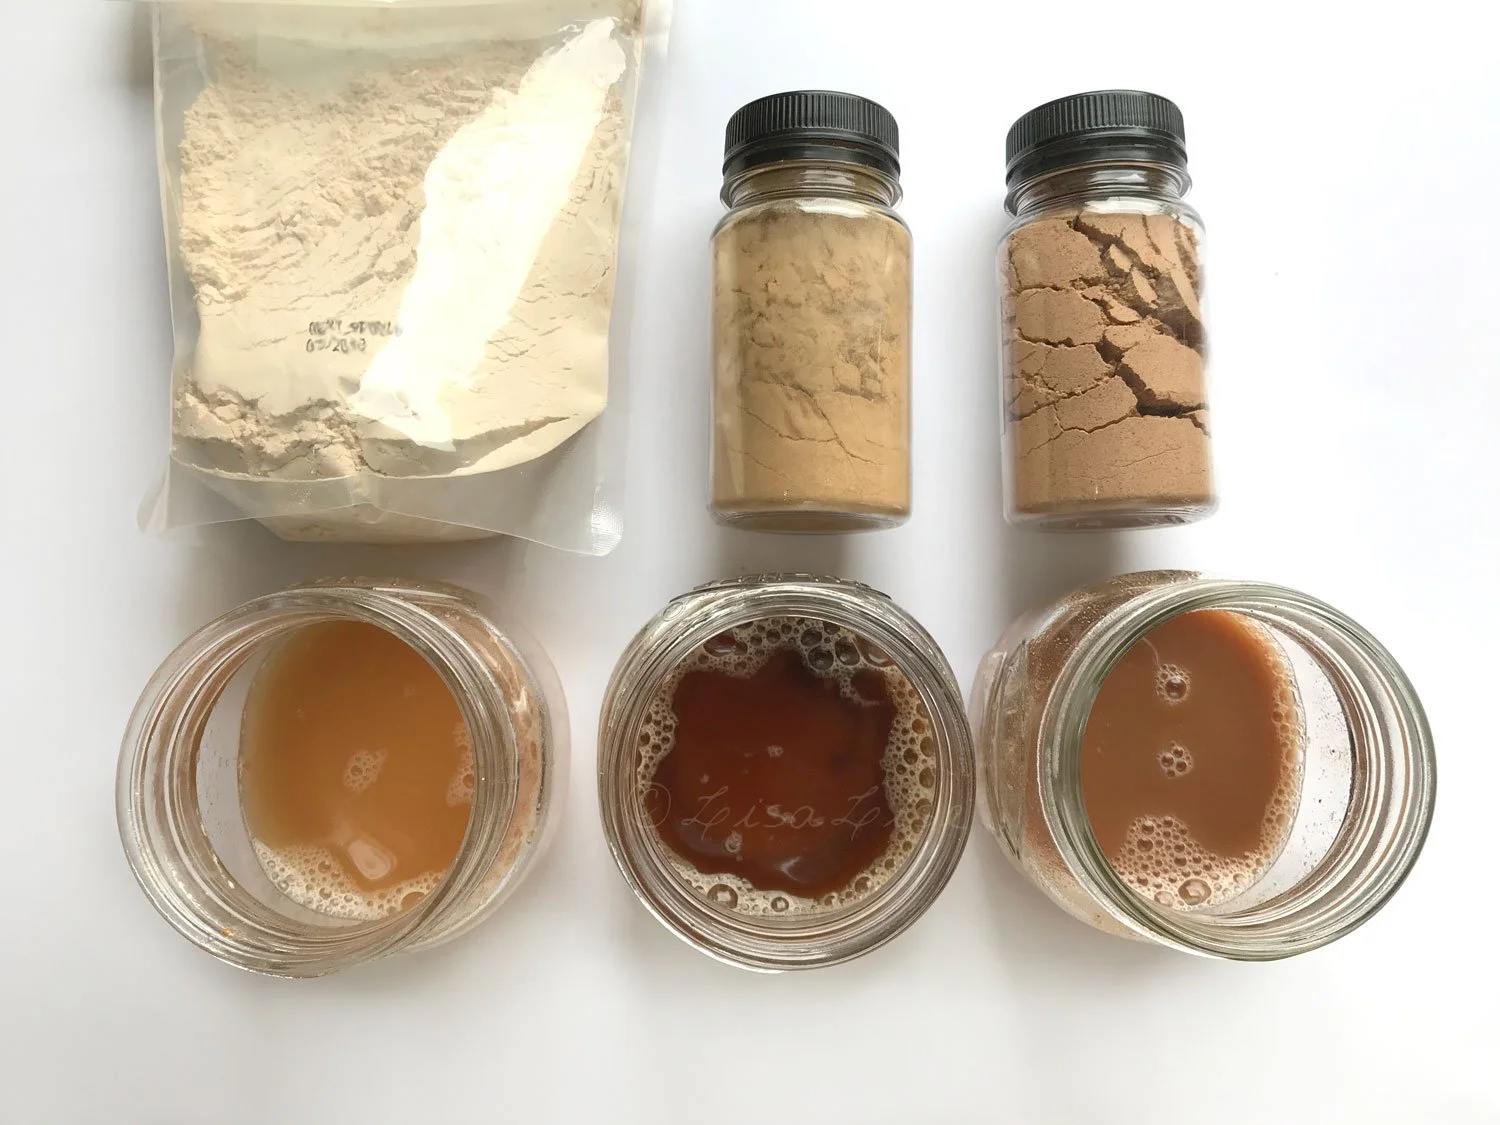
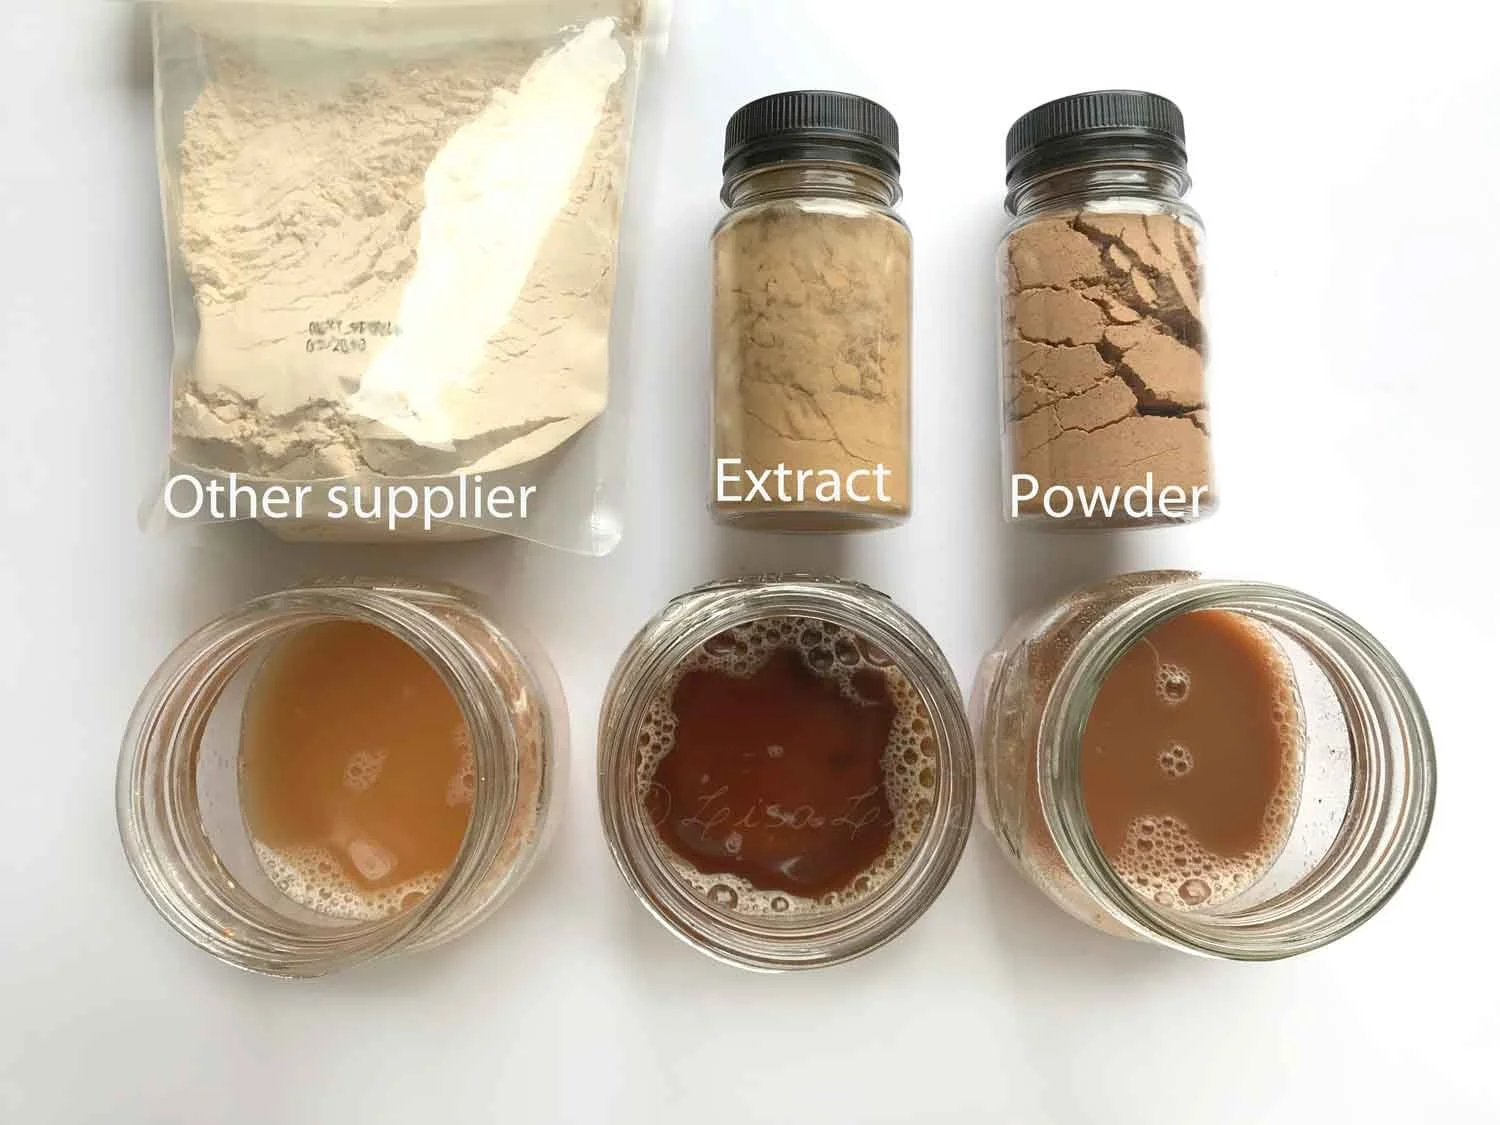
Pictured above: 3 versions of soapnut (also soap berry or wash berry)

Today's lesson: soapnut powder and dry extract are not the same and will produce 2 vastly different results.

Breaking Rules and Making Mistakes - Not the Best Start

For as long as I can remember, it has been my policy to ensure I had more than one source for any given ingredient.

In this instance however, I made 2 major mistakes:

  1. I assumed what I was looking for was commonly available

  2. I asked for the wrong thing

Ok.

The asking for the wrong thing part is kind of my own fault for not speaking enough languages and having to visit some sites through Google Translate.

But determination (or is that stubbornness?) kept me going.

After much searching and unsatisfactory samples from a few sources, help presented itself via a contact on social media – I was put in touch with a producer of soapnut products.

And then everything started going in the right direction.

I learned soapnut was produced in numerous forms, among these: powder and dry extract. It wasn't long after that samples of each arrived at my doorstep.

Testing the Difference

On the left is the ingredient I started out with. It has a markedly lighter color and more pungent, vinegary scent than either of the samples to the right. It is sold as soapnut powder, yet does not behave as powder (as you will soon see).

When I asked the producer about the color and scent differences, I was enlightened as to their production processes and quality requirements for the different products they produced.

A sensory test (rub between fingers) did not reveal much. The feel of all of these 'powders' seemed close to identical.

But there is a marked difference in how they behave:

A powder will not dissolve completely

A dry extract will

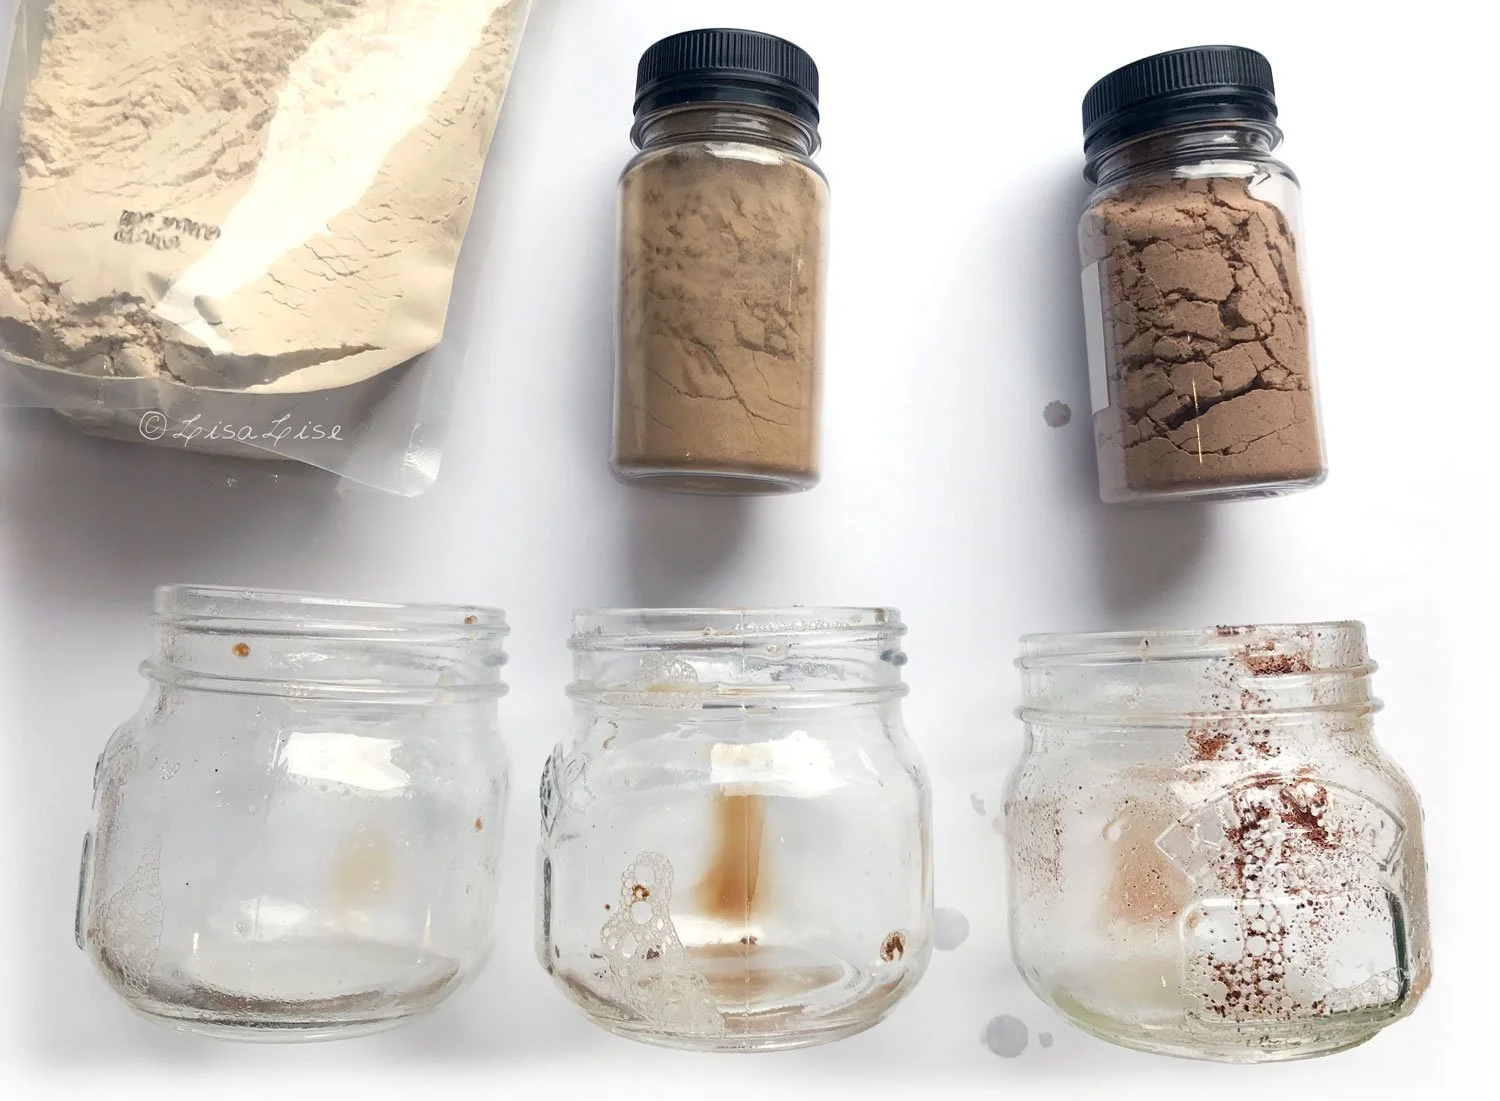
To test this, equal amounts of 'powder' were drizzled into 1 dl of distilled water and allowed to sit for a few minutes. The jars were then agitated (by hand).

The liquids all produced approximately the same amount of suds, but pouring the liquid out revealed the main difference between powder and dry extract.

The residue in the jar on the right shows why using a powder instead of a dry extract will leave a gritty, sandy, and unpleasant feel.

It's amazing how a single incorrect term could have caused so much frustration, but on the other hand, I see this kind of situation as a friendly reminder that there is always something new to learn.

Do Tell

Have you ever made the mistake of asking for one ingredient when you really meant something else? Please share your experience in a comment below.

PS. Are you ready to make your own bi-phase cleansers? The book below shows you how.

Slow Beauty Cleansing Milk

Lise

Pictured: A batch of my Slow Beauty Cleansing Milk featuring Rose and Soapnut. I did a series of these cleansers a few years back to test out a few different ingredient combos as well as to test the limits and capabilities of this particular emulsifier. The rose and soapnut combination performed beautifully repeatedly.

The best part? It's relatively easy to make.

This formula utilises a COSMOS certified and organic emulsifier (and oil thickening agent) that can be used either hot or cold (which is kind of cool if you ask me).

Today I'm going to show you how I made this cold process emulsion.

Spoiler alert: there's a reason the title includes 'Slow Beauty'.

COSMOS Emulsifier

After fooling around with Sucragel a while and discovering its quirks, I think the positives outweigh the negatives - especially in a DIY or small batch setting. It seems the jury is still out on whether or not Sucragel does well for larger batch sizes and I'm assuming this is because of the mentioned quirks, but we'll get into those in a minute.

What's in an Emulsifier

Sucragel is pretty widely available. I tried using it from a couple of suppliers as it is always a good idea to try ingredients from different suppliers. There can be differences in how an ingredient performs - even if it has the same INCI.

The INCI of the Sucragel I am using here is as follows: Glycerin, Prunus Amygdalus Dulcis oil, Sucrose laurate, Citrus Aurantium Dulcis fruit water

Because this is a glycerine based ingredient, adding more glycerine to your formula could be a bit overkill, so if you are thinking of adding your own glycerites to an emulsion where you are using Sucragel, you'll probably want to keep it at a lower percentage.

Depending on the texture you are aiming for, you can dose sucragel from 6 - 20% of your formula. This emulsion has a creamy, non-greasy feel and a viscosity that is my idea of cleansing milk perfection.

Because I had some bottles that held about 150 ml, my batch size here is calculated for 150 gr.

Shall we get busy?

LisaLise's Slow Beauty Cleansing Milk with Rose & Soapnut

Phase Ingredient Grams
A Demineralised Water 63.0
A Xanthan Gum 0.8
A Soapnut (dry extract) 3.0
A Rosewater 23.8
A Broad Spectrum Preservative of choice 0.9
B Rose Infused Castor Oil 42.0
B Sucragel 16.5

Method

  1. Combine phase A ingredients and allow to sit for 15 minutes.

  2. Combine phase B by slowly adding the oil to the sucragel bit by bit and stirring until homogenous with each addition. When combined, let stand for 15 minutes.

  3. Stir phase B again.

  4. Add phase A to Phase B little by little, stirring well in between additions.

  5. Adjust pH if necessary

  6. Transfer to container

Sucragel Quirks

Fair warning: it can seem arduous transforming Sucragel and oil into a homogenous whole. My supplier recommends adding the oil to the sucragel ‘drop by drop’ and stirring until thoroughly incorporated in between additions.

Admittedly, this process takes a bit of patience but the good news is, it can be done by hand and without the use of electrical mixers with excellent results.

I’ve tried using different stirring implements (both 'electrified' and 'non electrified'), adding the oil to the sucragel faster (or in larger amounts at a time), stirring less, and just about every combo I could think of to speed the process up.

My experience to date is: the slower you go, the better and more stable a result you get. Read: if you even try to rush it, you really risk an unstable emulsion. Also my experience: using a wide, flexible spatula to work the ingredients together gives the best results.

And now you know why I call this is a 'slow beauty' formula. So if you don't have time to 'get your zen on', do wait for a day when you're ready to give slow-making a go.

pH Notes

The ingredient variations I made to my own batches all resulted in pH levels ranging between 4.7 - 5.5, so no pH adjustment has been necessary.

Ingredients Notes

Soapnut Extract

Soapnut dry extract is not the same as powdered soapnut and will give you quite different results if you try replacing a dry extract with a powder. Stay tuned for a post explaining (and showing) the differences)

If you can't access dry soapnut extract but have soapnuts, you could try doing a decoction and replacing half of the water amount in this formula with your decoction.

Infused Castor Oil

This is quite in line with the slow-going-ness of this formula. I made my own rose-infused castor oil by adding dried rose petals to castor oil and allowing the mixture to cold infuse for a couple of months before straining and using the oil. Depending on the quality and freshness of the dried roses you use, this will add a lovely note of rose to your product.

You could replace the rose with any herb you prefer (lavender and rosemary come to mind as possibilities).

If you don't want to make an oil infusion, just use castor oil.

Rosewater

I made most of my batches with hydrosol, but to be a bit experimental, tried one batch with food grade rosewater (the kind you will find at specialty supermarkets). It worked beautifully and definitely won't be the last time I use rosewater of this type in a cleanser.

Preservative

I used benzyl alcohol in my experimental batches and it performed quite well. Estimated average shelf life: 8 - 12 months.

Do Tell

Have you worked with Sucragel before? What were your experiences? And if you have used Sucragel to make larger batches and are willing to share your thoughts, please feel free to drop a comment below!

Easy Whipped Shea Butter

Lise

Over the years, I have used shea countless ways - in emulsions, melt-and-pour products, bars, bath products, hair products, and a plethora of skin care products.

Along the way, there have been lots of opportunities to experience fails, and there have been many, but I have also learned from every single one of them.

A lot of formulators have a love/hate relationship with shea butter. While that’s perfectly understandable, I find it has far too much to offer in the way of skin and hair care to be dismissed simply because it can be fiddly to work with.

Today, I'm going to show you a beautifully simple whipped shea that works for me every time so even if you are new to working with shea, this might be a great way to get acquainted with this wonderful skin-and-hair-loving ingredient.

You can use either refined or unrefined shea butter, but be sure the butter is at room temperature and has a creamy, grain-free texture before you start.

LisaLise's Easy Whipped Shea

Ingredient %
Shea Butter 80.0
Jojoba (oil) 18.0
Antioxidant of choice 1.0
Essential Oil Blend (optional) 1.0

If you don't want to add essential oils, adjust the amount of jojoba accordingly.

Method

  1. Sanitise your equipment and work area

  2. Weigh oil and warm to 40°- 45°C

  3. Weigh shea and cut into small uniform pieces and transfer to 'whipping container' (choose something tallish that has room for your mixer blades)

  4. Transfer oil to shea

  5. Whip the mixture. Start at a low speed, then increase until the mixture is homogenous and light (2-4 minutes - depending on batch size)

  6. Add antioxidant and (any) essential oils

  7. Whip the mixture again until the consistency is light and airy (1-2 minutes).

  8. Transfer the mixture to your final container.

It's ready!

Note the difference in color of the final shea - that wasn’t due to whipping, but to the essential oil blend I added.

Over the next 24 hours the butter will ‘set up’ a bit, but will still be light, yet stable. You should be able to easily dip into the balm without having to 'dig’ it out.

A Few Whipped Shea Uses

This simple product is ideal for numerous things! Try it as

  • Hand & Cuticle Cream (a little goes a long way)

  • Foot Softener (apply after a footbath and don a pair of cotton socks for at home foot spa luxury)

  • Dry Hair Tips Conditioner (rub between hands and apply to tips of hair)

  • Body Cream (apply after bath for super soft skin)

  • Deep Moisturising Night ‘Cream’ (apply after your evening cleanse and massage in gently)

Do Tell

Have you ever made a simple whipped shea? What did you use it for? Please share in a comment below.

Dandelions For Skincare: Drying the Blossoms

Lise

In case you're wondering, this is not a picture of weeds (I've added some helpful text to give you a clue).

Long ago, I would to think only one thing when seeing a meadow full of dandelions: 'pretty, but just weeds'.

No more.

Today, we're going to do a bit of preparation for some honest-to-goodness botanical magic, so grab a basket and get ready to harvest a few dandelion blossoms!

Not convinced why you should be picking 'weeds'?

Then read on to discover what this little treasure of a plant has to offer!

What Makes Dandelions Special

Dandelion (INCI: Taraxacum Officinalis) may be the bain of many gardeners and homeowners, but this widely available plant has so very much to offer.

The 'Officinalis' part of the Latin name is a giveaway that dandelions have a history of medicinal use. Apart from a plethora of different applications for soothing and helping us heal, dandelions are edible (and nourishing) from tip to root.

And there's even more.

My interest in this common plant is due to their natural content of cichoric acid.

And why is this exciting?

Because cichoric acid does a really cool thing: it inhibits the enzyme that breaks down hyaluronic acid in the body. Read: it protects collagen from damage from free radicals.

So, if cichoric acid has the ability to protect our own hyaluronic acid from breaking down, then it might be fair to view dandelions as all-natural little fountains of skincare youth.

See why I'm a little excited?

You: Sounds very interesting Lise, but is all this tested and proven by science?

I love it when you ask me serious stuff!

So far, I am seeing initial conclusions like 'warrants further study' and 'looking positive', but scientific tests are still too few and far between for any conclusive evidence. The prospects have me interested enough to keep digging for more information.

Meantime, there's no reason to put off working with what's growing so abundantly, is there?

So, are you ready to get busy with dandelions?

Dandelion Picking Tips

Although you can use the entire plant, we're going to be concentrating on collecting and drying the blossoms for this exercise.

Where to Pluck Dandelions

Find an area away from roads and other possible sources of contamination (such as pesticides, urinating pets etc). If your own garden lawn happens to fit this description and is filled with dandelions, it's a perfect place to start.

When to Pluck Dandelions

In theory, you can pluck dandelions any time of day, but I find mornings both pleasant and the best time to get the freshest blossoms. Any newly blossomed plants are easy to spot in a lawn (I picked blossoms from my lawn over a period of 3 days). Every blossom I picked for this batch had appeared overnight.

How to Pluck Dandelions

Pinch off blossoms at the top of the stem.

How to Dry Dandelions

Spread out on a clean cloth and allow to wilt in the shade in open air for a few hours. This will give any resident tiny bugs a chance to find another place to reside.

If you have a drying net, use that. A drying net allows air all around the plant.

I started out using my garden table to wilt the flowers, then moved them to a paper towel indoors and placed them face down to finish drying.

Allow the blossoms to dry throughly. Depending on the climate you are in, this could be from a few days up to a couple of weeks.

If you don't have the space to let the blossoms air dry, spread them out on a tray and leave in the oven on very LOW HEAT (about 60°C) overnight.

If you have a dehydrator, even better. Set the dehydrator to between 8-10 hours at about 60°C

When the blossoms are thoroughly dry, pop them into a bag and store dry and dark until use.

A special thanks to Vivienne at The Herbal Hub for the original inspiration to take a closer look at these gems.

Do Tell

Do you work with dandelions in your skincare? How do you use them?

Links to Nerdy Stuff about Dandelions and Cichoric Acid

https://pubs.acs.org/doi/abs/10.1021/jf0258858

https://www.ncbi.nlm.nih.gov/pubmed/24871659

https://www.sciencedirect.com/science/article/abs/pii/0031942295008659

https://www.ncbi.nlm.nih.gov/pmc/articles/PMC3982519/

https://pubs.acs.org/doi/abs/10.1021/acs.jafc.5b04533

http://pubs.rsc.org/en/content/articlelanding/2017/ra/c6ra25901d#!divAbstract

TIP: Want to get started making your own extracts but don’t know where to begin? The bundle offer below might be just the thing.

How to Work With Stinky Ingredients

Lise

Working with plant-based ingredients has its occasional challenges. Some of the ingredients I work with have an inherently heavy, sharp, pungent, musky, or otherwise less than appealing scent.

Ok, that was the diplomatic description.

Some of them are so stinky there is instant nose-wrinkling and the instinctive pull-back when the seal is broken and the package is opened.

Yes, that stinky.

At the same time, some of them have all kinds of skin-loving goodness to offer, so they cannot be disregarded.

Choices must be made.

The Stinky Conundrum

So, how shall we solve this stinkiness? Shall we mask the odor?

Perhaps just replace the ingredient?

There's also 'the industry maneuver' (my term) which consists of using such a small amount of the ingredient that it won't be discernible to the nose. This is common practice in many commercially manufactured cosmetics and is also referred to as a 'tip-in'.

Using an ingredient as a tip-in is great for marketing purposes, but the downside is – of course – having to live with the fact that the ingredient won't do a dang thing because there's such a teensy tiny amount in the product (0.05%) that it might just as well not be there at all.

So, maybe we should give up and dump the stinky ingredients entirely?

Or.

Maybe we could figure out how to incorporate the smelly things in such a manner that the end product doesn’t insult the nose.

Maybe we can even make the end product a delight to the nose?

Considering the Synthetic Factor

In truth, it's relatively easy to mask even the stinkiest ingredients by using a synthetic scent. Think of detergent. Without the addition of (a synthetic) perfume, most household cleaning agents are, to put it politely, downright foul smelling.

Grabbing a bottle of fragrance would be the most obvious and easiest choice, but I have a problem with that as I am not a fan of synthetic perfumes.

Ok that was the diplomatic description.

In truth, I find (almost all) synthetic fragrances worse than the stinkiest ingredients I work with. Despite several attempts, I cannot bring myself to work with them. This might be due to a perfume allergy (I've never been tested, so I can't say for sure), but it could be because of my lifelong inherent aversion to anything synthetic.

What’s the Stinkiest?

A while back, I asked a few fellow formulators if there were any particular ingredients they would categorise as stinky and hard to work with.

There was a literal flood of replies.

Here are the stinky winners

  • Neem oil (the all time winner and receiver of most votes)

  • Cocoa butter

  • Unrefined shea butter

  • Lanolin

  • Wheat germ oil

  • Argan oil

  • Carrot seed oil

  • Tamanu oil

  • Pomegranate Seed Oil

  • Evening Primrose Oil

  • Raspberry Seed Oil

  • Kelp Powder

  • Spirulina

  • Tea Tree Essential oil

  • Valerian Essential Oil

  • Soapnuts

These ingredients all have wonderful properties that are difficult to simply disregard. So, how do we deal with all this stinkiness?

We Take Stinkiness into Account

After years of trial-and-error, it has become second nature to me to take the inherent stinkiness of some ingredients into account when creating a formula.

Even though there are some limitations, it is possible to 'bend' a stinky ingredient (or 2) into something entirely pleasant with no need of masking the smell.

The secret is deceptively simple: work with, not against.

Get your perfuming nose on and get ready to include said stinky ingredient as part of the fragrance.

You doubt?

It's perfectly ok. I didn't think it was possible in the beginning either.

To get busy, we need to do a bit of nose exercise (and no, you don't need to learn how to wiggle your nose).

How To Get Your Perfuming Nose On

This is a relatively simple exercise, but does require your full attention and concentration.

Your nose may be a little offended at first, but will probably surprise you with hidden secrets sooner than you expect.

The object of this exercise is to train your nose to pick out the components of (any) fragrance.

Choose an ingredient. Don't start with the absolute stinkiest ingredient, but choose one you perhaps find a bit challenging. For example, if you have an ambivalent relationship with the scent of unrefined shea butter, start there.

Sniff the ingredient until your nose is thoroughly acquainted with it.

Alternate between sniffing the ingredient and sniffing fresh air.

Continue for a few minutes and you will start to discover the 'undertones' and 'overtones' of the scent. Is there a muskiness in the background? Is it slightly woodsy? Nutty? Fruity?

Identify the components as best you can and write down your impressions.

At one point, your nose is going to ‘sign off’ and that will be your signal that this session has ended.

Wait at least an hour before continuing.

It will probably take a few sessions, but I’m pretty sure it won't be long until you have dissected the scent and can begin to work with it. If there is a musky undertone you find unappealing, the addition of a woodsy fragrance can synergise and 'bend' the scent in an entirely different (and more pleasing) direction.

I admit this takes a bit of practice, but I also know you can totally do this. I think you will surprise yourself at how quickly your nose is able to 'dissect' what you are sniffing. Keep at it and you will discover how easy it suddenly is to dissect the components of a wine, perfume, or any dish.

Let’s Take Cocoa Butter

When you've been exercising your nose and making all kinds of amazing discoveries at how clever your nostrils are at picking out subtle details and undertones, you can move on to this exercise.

We're going to 'bend' the scent of an ingredient that made it quite high up on the list of stinky ingredients in my impromptu poll: cocoa butter.

It almost seems unfair to call it a stinky ingredient. Most people love the smell and taste of a chocolate bar. I know I do. I actually also love the scent of cocoa butter if I am thinking of dessert. But right now, we're putting it on our skin. And not everyone wants to smell like dessert all day.

As delicious and chocolatey as unrefined cocoa butter might smell in the container, it can be downright overpowering when it is applied to the skin in a leave-on product.

In a body butter, non-chocolate-tasting lip balm, or any other water-free product, cocoa butter can have an uncanny ability to take over the entire fragrance profile and become both heavy and cloying.

How to include cocoa butter as a component of our fragrance? Here's a little exercise on how to do just that.

Cocoa Butter Base Note Exercise

For this exercise, you’ll need

  • Unrefined cocoa butter

  • Essential oils

  • Any infused oils you might want to include

Method

  1. Have your essential oils at room temperature

  2. Gently melt 5 grams (a teaspoon) of cocoa butter in a small glass container (5 grams for each scent you want to create).

  3. Sniff the cocoa butter. Note the properties: heavy, creamy, and chocolate-like. This is the base note from which you shall create your fragrance.

  4. The next step is to decide which direction you want to take this base. Here are a couple of examples to help inspire.

Woodsy : For a woodsy scent, add a component such as cedarwood, rosewood, petitgrain, or sandalwood. A combination could also be used. Round out the blend by introducing an element of citrus freshness – bergamot, mandarin, blood orange, grapefruit, or lemon could all be considered.

Oriental : To bend your cocoa butter in a more exotic direction, add myhrr or frankincense. Introduce a floral element with rose or geranium, then consider a titch of vanilla to round out the scent and make it deliciously exotic.

Floral : For a floral scent, start with a woodsy component to anchor the cocoa butter (cedarwood might be great here). Then add some rich, dense florals such as geranium or rose. Lighter florals risk being 'buried' in the fragrance profile. Chamomile – with its inherent earthy note – is another possible option. Lavender and/or an element of citrus can be added to round out the scent.

Want to try something else? Go for it! When your nose is 'tuned in', you can create any fragrance combination you think you would like.

Chill, Solidify, and Do a Nose Test

When you have finished your test bowls with essential oils and cocoa butter, pop them into the fridge and let the mixture solidify.

To test the solidified samples, warm the bowl (or solidified cocoa butter) slightly in the palms of the hand and then do a nose test to see if you are satisfied with scent profile. If you are, then you know the EO’s you blended into the sample will in all likelihood be useful for anything you make with cocoa butter

TIP : If you happen to make your own botanically infused oils, these can also be super useful in a fragrance creating setting.

Do Tell

Which scent combos have you tried adding to cocoa butter to create your fragrance? Were you happy with the results? Please share in a comment below.

Tips for Making Lavender Powder

Lise

Working with different dried herbs in various cosmetic products has taught me that some herbs are far trickier to transform into a 'proper' powder than others.

Take lavender for example.

I love it to pieces, but at the same time, it can drive me absolutely batty. After several attempts at making my own powders without much luck, I started buying powdered lavender. Unfortunately, that has never brought me any joy either – regardless of supplier.

It's entirely possible that I'm overly picky, but in my book, a powdered facial cleanser should not contain ANY annoying bits that keep sticking to the skin after everything else has willingly rinsed away.

The Perfect Lavender Powder Challenge

The challenge of transforming dried lavender into a perfect powder that rinses away without leaving bits sticking to the face was hereby decreed (by me to myself). I started by investing in a rather large bag of dried whole buds so I could get serious about experimenting with different techniques.

Spoiler alert: My idea of the perfect powder doesn’t exist, but I have gotten pretty close.

I'll spare you my numerous failed attempts and concentrate on the method that has shown the most promise.

The Grind

Above: my preferred herb-pulverizing apparatus. Most of the time, this handy coffee bean grinder does a bang-up job.

But no matter how long you grind dried lavender buds, they only become something that looks like a powder.

Try sifting lavender buds that have been in a grinder and you'll see what I mean. It's as if the dried buds are too lightweight to be properly ground to a powder. And that’s exactly why they won’t willingly become a powder. The plant/buds are too fibrous.

Rethinking the Grind

Since my main goal was to use the lavender in a powdered face cleanser, and my powdered face cleansers include clay, it occurred to me that it might be possible to 'weigh down the lavender' by adding some clay to the lavender buds in the grinder.

And gosh darned if that didn't help – a whole lot.

Here are the results of a few different clays mixed with lavender buds and run through the grinder.

The winner is hopefully evident in the picture above. Rhassoul (also called ghassoul) seems to have the necessary weight to 'hold' the lavender. It's also the heaviest of all the clays, so it makes good sense.

The photo above was taken prior to passing the ground mixture through a sieve.

Sifting the ground mixture helped remove most of the remaining unwanted 'fluffy bits'.

Admittedly it’s a bit of work, but if you need lavender powder and are making a product that includes clay, try combining the 2 for some pretty decent results

Pictured at the top of this post is some of the final discarded bits – artfully arranged for your viewing pleasure.

Do Tell

Do you have a successful method of making lavender powder that you're willing to share? Please post a comment below!

PS: LisaLise Club members have access to all kinds of my best tips and useful shortcuts to ease the workload. Want to join us? Click the picture below to learn more about what the Club has to offer you.